TokenCast NFT Art Display
This guide will walk you through the necessary items and assembly steps to build your frame.
Build Guide
Requirements (~$360)
-
Raspberry Pi - ($65) This will be the brains of the picture frame. If you’re looking to only display still images, you can get by with the 1GB version. Otherwise go with the 4GB version to show off animated artwork.
-
[SD Card - ($5.80)]https://www.amazon.com/dp/B06XWN9Q99/) We’ll load the Raspberry Pi operating system using this SD card.
-
IPS Monitor - ($190) An IPS monitor is great for displaying vivid images and looks great at any angle. You can display images for long periods of time without worrying about image burn-in. These portable monitors work well for the project because they’re lightweight, thin, and can be powered via USB (ie. directly from your pi). Don’t worry if the bevels are not uniform, we’ll use the photo mat to cover everything but the screen.
-
External keyboard - A keyboard will be useful for initially configuring your Raspberry Pi’s WIFI settings.
-
Cables You’ll need a power cable for your Raspberry Pi, a USB cable to power your monitor, and an HDMI to transmit video. The IPS monitor will likely come with cables but I recommend getting some angled ribbon cables to fit flush against the frame.
-
HDMI Cable - ($16) You can find cheaper ones on AliExpress, but depending on where you’re shipping to, it may take considerably longer.
-
Frame - ($20-$50) This is where you can really personalize the project. Find a good 12”x16” frame that matches your style. Because these are standard frame dimensions, you can find them much cheaper than a custom built frame.
-
Photo mat - ($20) The mat is an additional point of personalization and is used to hide the bevel of the monitor. Choose an acid-free material to prevent discoloration over time. To get the most real estate out of your monitor, you should custom cut the mat board (this is a service that most frame stores will provide).
- Outer dimensions: 12”x16”
- Inner dimensions: 7.5”x13.25” (for the monitor linked above)
-
Foam board - ($10) We’ll use this to center the monitor in the frame and hold the Raspberry Pi in place. You can usually find these at a local frame supply store. Ask them to cut it into two 12”x16” rectangles.
-
Exacto knife - ($2.50) We’ll use this for cutting the foam board to fit the monitor and Raspberry Pi.
-
[Heat sink ($8)] (https://amzn.to/2ZjZSj3) This will help the Raspberry Pi dissipate heat.
Setting up your Raspberry Pi
- Install the Raspbian operating system onto the SD card
- Insert the SD card, keyboard, and monitor and boot up your Raspberry Pi
- Upon boot up the OS should prompt you to configure the wifi network and install updates.
- You can adjust the resolution by opening the start menu, select Preferences, Raspberry Pi Configuration
- Run the following script to install TokenCast:
sudo bash -c "$(curl https://raw.githubusercontent.com/codyborn/tokenCast/master/install.sh)"
- The Raspberry Pi will reboot for settings update to take effect and should automatically start tokenCast on reboot
Connecting to your device
After running the installation script, you should be prompted with a QR code and a URL. If connecting with your phone, you can scan the QR code and navigate to the site with a web3 wallet. If on a PC, you can navigate to the URL https://tokencast.net/Account and enter the device ID by clicking “Register New Device”.
For mobile devices, we recommend using Opera browser for Android or MetaMask for Android or IOS. For your PC, MetaMask provides a great browser plug-in.
You can connect multiple devices to the same frame. When adding a new device, navigate to https://www.tokencast.net/Account and enter the same device ID. You can always find your device ID by looking in the bottom right corner of your frame.
Assembling the frame
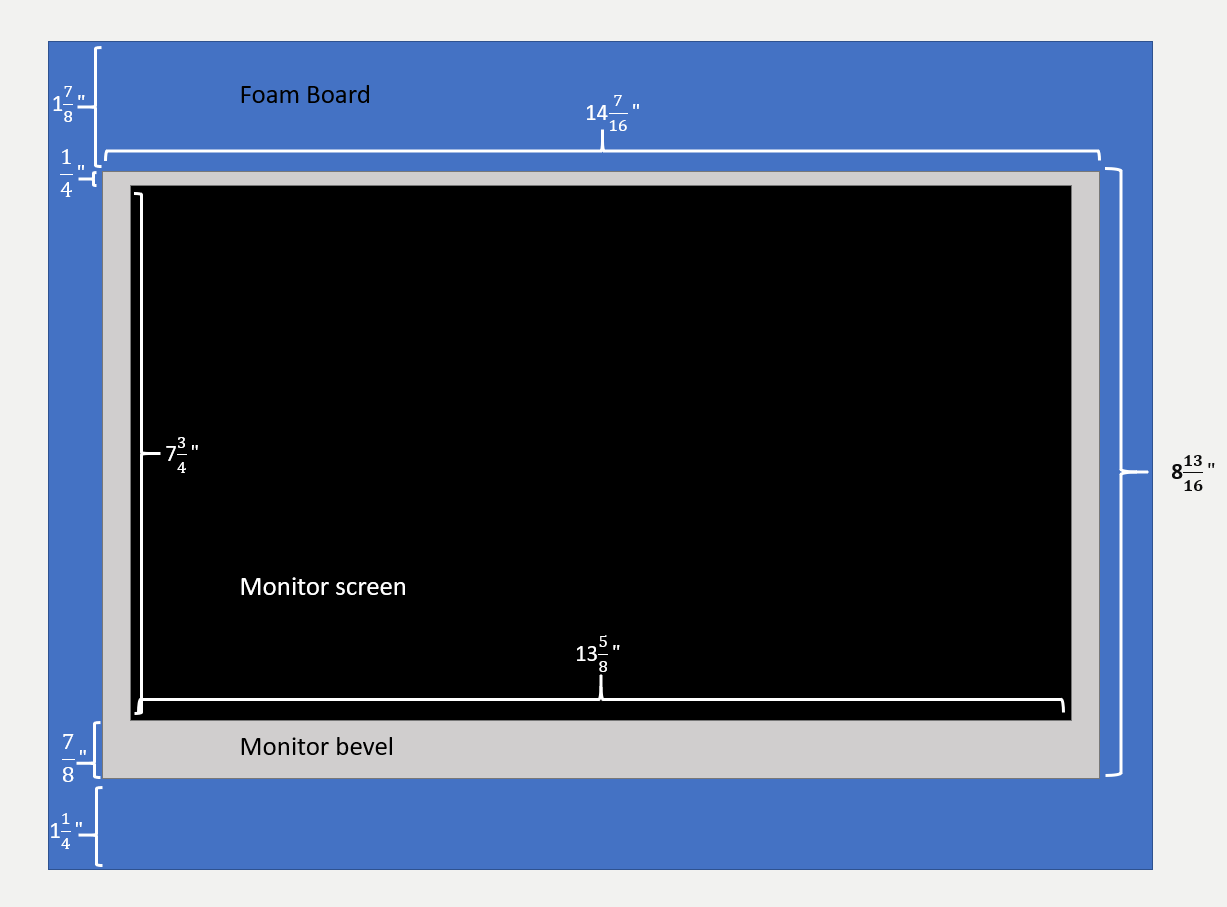
The only tricky part in putting the frame together is cutting the foam board and frame backboard to fit the monitor and the Raspberry Pi. When cutting the foam board, don’t forget to take into account the slight offset of the monitor screen (the lower bevel is slightly larger than the upper bevel). In the case of the monitor linked above, the top bevel is 1/4” while the bottom is 7/8”. That means that we’ll need to position the monitor slightly lower to have the screen centered. If x is the bottom margin and y is the top margin, we want the margin plus the monitor bevel to be equal on the top and bottom:
- 7/8 + x = 1/4 + y
We also want the screen to be centered:
- screen offset = (12 - 7.75 (screen height)) / 2 = 2.125
Therefore:
- 7/8 + x = 1/4 + y = 2.125
- x (bottom) = 1.25 = 1 1/4”
- y (top) = 1.875 = 1 7/8”
After wiring up the Raspberry Pi, find a good position for the board to sit with the top of the board facing outward (to let heat escape). Since the Raspberry Pi won’t be visible from the front, its position is less important. Cut a hole in the second 12”x16” foam board and the frame back panel to fit the Raspberry Pi.
Support this project
Feedback and contributions are welcome. Token and art donations are appreciated!
Our public Ethereum address is TokenCast.eth
